PTV Drive&Arrive Excel Add-In
This page is to describe the usage and the functionality of the Excel Add-In for PTV Drive&Arrive. You can download and use the Add-In for free: DAExcelAddin.msi. Please note that this Add-In is a test tool and not a part of the PTV Drive&Arrive product. If you have an old version installed, please uninstall the old version before installing the new one.
Important note: PTV may block access for creating new trips for free without prior announcement.
Functionality
- Working with Excel 2013 and newer
- Define and create trips - we use a free token for that. Please note that we may limit the number of trips in our system without prior notification to the users of the Add-In
- Monitor the ETA for your trips with all their stops in real time
- If you have your own token, you are able to load all your trips out of the system and monitor them in real-time, even if they were created somewhere else.
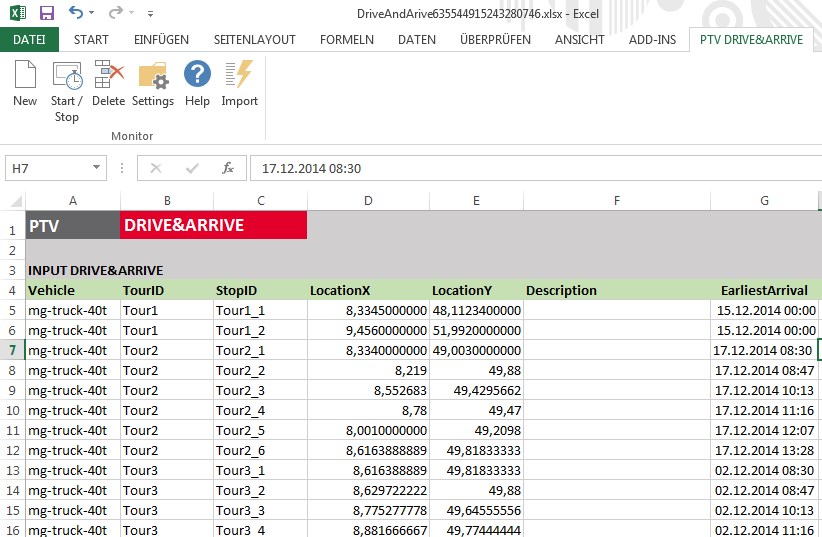
Here you can see a screenshot of the Excel Add-In.
Installation
If you have already an old version of the Add-In on your machine, please make sure that this version is uninstalled before installing the current version. To uninstall, go to the "Control Panel" and navigate to "Programs and Features". Select the "PTV Drive&Arrive Excel Add-In" in the list and uninstall it. After the uninstallation wizard finished, you can download the latest Add-In version here and start the installation by executing the downloaded file. Please close any opened running Microsoft Excel instances before.
Using the Add-In
Start your Excel. Excel comes up with an empty sheet. You can see a new menu category "PTV Drive&Arrive" in the ribbon bar. If you click on that category, the Add-In reminds you that it requires a special template to work (s. below). Confirm that.
Creating a template sheet
If you want to use the Add-In, you have to use our sheet template that comes with the Add-In. It is not possible to use your own Excel sheet but you can use references in our template to fill it with your data. ThePTV Drive&Arrive template is created when you click on "New" in the ribbon bar. Do not forget to save the sheet on a convenient place on your hard disk after changing it!

Defining trips
After creating the template, you have to enter the trips. The rows of the sheet are stations. The stations are grouped to a trip by the content of the column "TourID". Alle stations with the same "TourID" are considered as one trip and are passed to PTV Drive&Arrive in the order they appear in the sheet. You can freely choose "TourIDs" and "StopIDs".
In the first column, you have to define what type of vehicle is used for the trip.
Furthermore, you have to define the location of the stations by their co-ordinates. Please note, that we do not integrated a geocoding of addresses in the sheet. You may expect the column "description" to contain the address that has to be geocoded, but the column "description" is for your own reference only and has no explicit meaning for ETA calculation.
Each stop has these parameters, in addition to its position:
- EarliestArrivalTime - this is the earliest time you expect the vehcile to arrive at that stop. Please define date and time.
- LatestDepartureTime - this is the latest time you expect the vehicle to leave the stop. Please define date and time
- ServceTimeAtStop -this is the time you need to load or unload at the stop or - more abstract - the time you scheduled to stay at that stop
- useServicePeriodForRecreation - if your stay at a stop (your service time defined above) can be used as rest and break time, you can set this parameter to "TRUE", otherwise to "FALSE". We will take that into account when calculating the ETA by consiering the fatigue management of the driver
- weightWhenLeavingStop - you can enter the weight of your vehcile here (optional). If provided, we will use this indication to take care of physical restrictions on the road when calculating the ETA, e.g. by avoiding bridges that are not allowed for the weight of the vehicle
Creating and monitoring trips
After entering all tour and stop details, you can click on the "Start/Stop" button in the PTV Drive&Arrive ribbon.
- if the trips are not created before, the columns "TourSCEMID" and "StopSCEMID" are empty. By clicking on "Start/Stop", there are two things happening: first, the Add-In creates the SCEMIDs and fills out the sheet. Second, it subscribes for notifications to these SCEMIDs.
In default mode, creating trips is free for trial purposes. If you provide your own PTV Drive&Arrive token in the settings (s. description below), creating trips is billed according to our terms of use. - if you already created SCEMIDs or in case you opened a sheet with existing SCEMIDs, clicking on "Start/Stop" only re-subscribes to notifications and does not creates SCEMIDs.
Deleting trips
If you select one or more rows of a trip, you can delete all information of this trip in our system by clicking on the "Delete" button in the ribbon bar. Please note, that this is cost-neutral but makes your trip not accesible any more.
Settings

By clicking on the button "Settings", you can open a form as shown in the picture above. It enables you to perform these operations:
- Tab "About" - watch licence file as well as watching and deleting the log file. This is required for support only.
- Tab "Connection" - configure your proxy settings as the Add-In requires internet access
- Tab "General" - you can define your default vehicle profile. If you own your own Token, you can save the Token here. Then, this token is used for creating trips. In addition, by defining your own token, we enable the button "Import" in the ribbon bar (s. description below)
Importing trips
Important note: this functionality is only available if you provide your own PTV Drive&Arrive token in the settings (s. description above).
If you click on the import button, the PTV Drive&Arrive Excel Add-In retrieves all trips in the system that were created with your specific token. It does not matter whether the trips were created with the Excel Add-In or any other application using our API. After the import, monitoring can be started / stopped as described above.
© 2025 PTV Logistics GmbH | Imprint